Introduction
A digital clock built with an alarm system is called as an alarm clock. Along with showing time it includes a preset timer to remember and trigger an event when the timer expires by generating an alarm. Alarms can be configured for different time intervals say daily or weekly which can trigger different set of actions. The actions can range from blowing a buzzer or switching on a light. The sound of an alarm can be stopped by pressing the button or automatically stop by producing a beep sound in particular time duration.
As mentioned above the digital clock need to be configured with time and appropriate alerts to be executed. In order to trigger alerts, it may need a different set of protocols there by this project can be extended to an IoT solution by using internet scale protocols like HTTP or MQTT. The idea of this project is to implement the digital clock by using a Micro Controller (PIC in our case) by using various interfaces like LCD and Keypad. Keen to learn more on digital alarm clock project? Detailed requirements are given below.
Requirement Details
Here are the requirements of this project.
Default Screen
- It should display the time and date with the next expected alarm event.
Config Screen
- On press of the UP or DOWN (User Keys) keys the system should enter to Config Mode
- Idle screen for more than 5 secs should switch to default screen
Config Mode
- This should contain 2 option
- Set Time & Date
- Set / View Alarms
- The UP / DOWN keys are used to navigate
- A long press of UP Key should enter the selected menu
- A long press of DOWN Key should log out
Set Time & Date
- Should show the current time and date. The Secs field should blink indicating the field to be changed
- The UP key should be used to increment the time. Rollover on reaching max
- The DOWN key will be used to choose the field circularly
- A long press of UP Key should take you back to main menu
Set / View Alarms
- Should show all available alarms
- The UP / DOWN keys are used to navigate
- A long press of UP Key should enter the highlighted Alarm
- Should be able to edit and delete the alarm
Skeleton Code
The skeleton code in a very interesting concept used in Emertxe. By looking into the skeleton code, you will get a clear picture into converting the given requirement into a working solution. This will also take care of important aspects like modularity, clean coding practices, re-usability etc.
Sample Output
Here are the sample output expected by the end of project execution.

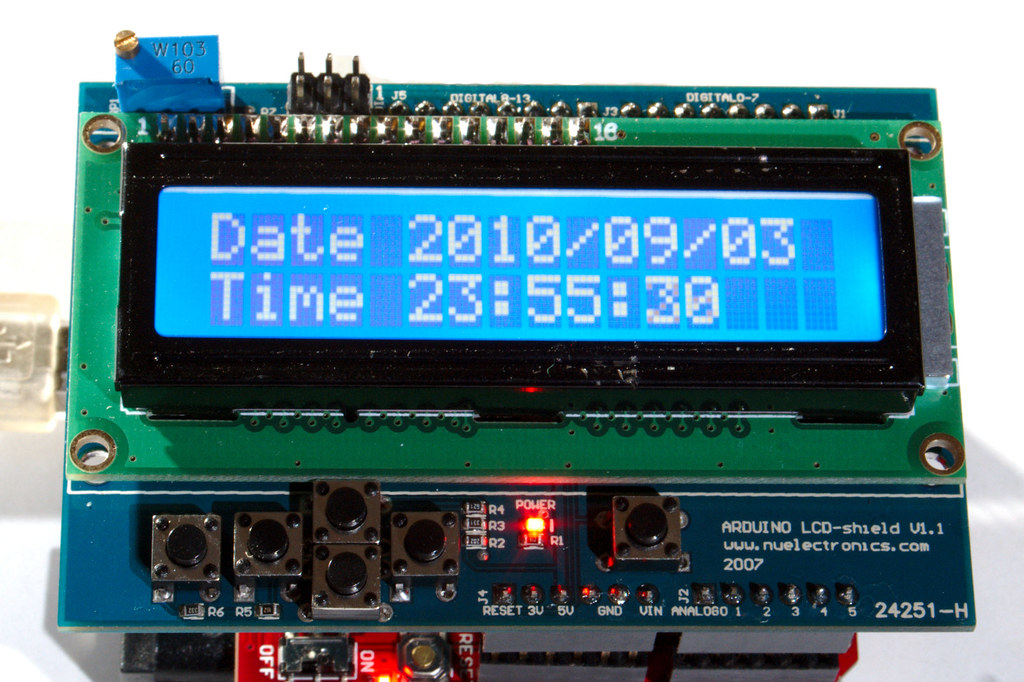
Fig1: Default Screen

Fig2: Default Screen. The next event should be shown every 5 secs for 2 secs. Observe ‘O’ for trigger once

Fig3: Default Screen. The next event should be shown every 5 secs for 2 secs. Observe ‘D’ for trigger Daily

Fig4: Default Screen. The next event should be shown every 5 secs for 2 secs. Observe ‘W’ for trigger Weekly

Fig5: Config Screen. You get this screen by pressing either UP or Down Key. If left Idle for 5 Secs, Should go back to Default Screen. Long press of UP should provide the next screen

Fig6: Config Set / View Event Screen. Long press of UP key should provide the next screen. Long press of DOWN key should go back to previous screen

Fig7: Config Set Event Screen. By default the Hours field of time should blink at the rate of 1Hz, use the Left and Right keys to move to different fields

Fig8: Config Set / View Event Screen. Long press of UP key should provide the next screen. Long press of DOWN key should go back to Config Screen

Fig9: Config Screen. You get this screen by pressing either UP or Down Key from Default screen. If left Idle for 5 Secs, Should go back to Default Screen. Long press of UP should provide the next screen

Fig10: Config View Event Screen. Should show all the set events one by one. Use Up or Down Key to navigate, Left key to delete the event, Long press of Right Key should take you to previous screen

Fig11: Config Time and Date Screen. Long press of UP key should take you to the next screen. Long press of Down Key should take to the previous screen

Fig12: Config Set Time Screen. By default the hours field blinks at the rate of 1 Hz

Fig13: Config Time and Date Screen. Long press of UP key should take you to the next screen.
Long press of Down Key should take to the Config Screen

Fig14: Config Set Date Screen. By default the day field blinks at the rate of 1 Hz
- Fig1: Default Screen
- Fig2: Default Screen. The next event should be shown every 5 secs for 2 secs. Observe ‘O’ for trigger once
- Fig3: Default Screen. The next event should be shown every 5 secs for 2 secs. Observe ‘D’ for trigger Daily
- Fig4: Default Screen. The next event should be shown every 5 secs for 2 secs. Observe ‘W’ for trigger Weekly
- Fig5: Config Screen. You get this screen by pressing either UP or Down Key. If left Idle for 5 Secs, Should go back to Default Screen. Long press of UP should provide the next screen
- Fig6: Config Set / View Event Screen. Long press of UP key should provide the next screen. Long press of DOWN key should go back to previous screen
- Fig7: Config Set Event Screen. By default the Hours field of time should blink at the rate of 1Hz, use the Left and Right keys to move to different fields
- Fig8: Config Set / View Event Screen. Long press of UP key should provide the next screen. Long press of DOWN key should go back to Config Screen
- Fig9: Config Screen. You get this screen by pressing either UP or Down Key from Default screen. If left Idle for 5 Secs, Should go back to Default Screen. Long press of UP should provide the next screen
- Fig10: Config View Event Screen. Should show all the set events one by one. Use Up or Down Key to navigate, Left key to delete the event, Long press of Right Key should take you to previous screen
- Fig11: Config Time and Date Screen. Long press of UP key should take you to the next screen. Long press of Down Key should take to the previous screen
- Fig12: Config Set Time Screen. By default the hours field blinks at the rate of 1 Hz
- Fig13: Config Time and Date Screen. Long press of UP key should take you to the next screen.
Long press of Down Key should take to the Config Screen